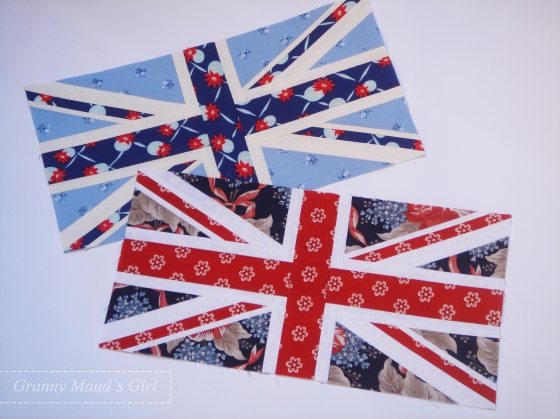
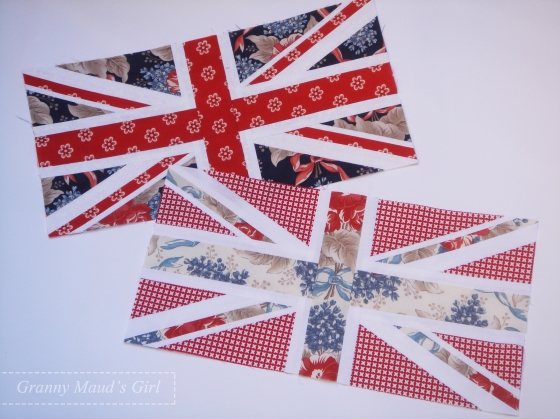
I am queen bee of the Compass Quilters group in February, and I have chosen red, white and blue Union Jack blocks.
What says ‘queen bee’ more than the Queen herself? I cannot ask the group to make blocks inspired by stylish hats, corgis and lovely brooches (too much fiddly appliqué), but I can ask for a British flag block to represent Her Majesty.

Do not tell my dad about this. He would insist I ask everyone for Welsh dragons, but they are much too fiddly to sew!
I have liked the look of the many Union Jack quilts I have seen, but most of them stylised the flag’s design and did not get the dimensions of diagonal stripes quite right. Thanks to the powers of the Internet, I found an explanation of how to draw the flag in the correct proportions and set to work drawing myself a template that I could use for foundation paper piecing.
Normally, the Union Jack is red, white and blue, and I am staying with these colours as they are all favourites. However, I am asking group members to include light blue as well as dark blue and to mix up the placement of the reds and blues.
These are some of the fabrics I pulled from my stash to make the quilt. In addition to these, I am including tone-on-tone white prints and solid whites. I think I would also happily welcome royal blue into the mix.

I chose a range of red, white and blue fabrics, including light and dark blues, and bright reds. Of course, flowers feature heavily!

All of my friends know I love floral prints, stripes, checks and spots, like these red and blue blender fabrics.
I am asking my bee mates to avoid solids (except white) unless that is all they have in their stash. I am also asking my bee mates to avoid teal blues and wine reds in favour of the shades pictured if they can, and to avoid batiks and hand-dyed fabrics – as I dislike batiks and live in fear that hand-dyed colours will run.
The block
The finished Union Jack block is an unusual size for a quilt block to suit the correct proportions of the flag. It is:
- 15½ x 8 inches (cut)
- 15 x 7½ inches (finished).
I have sewn the block using foundation paper piecing techniques. I find this gives the most accurate finish. It is a lot easier than it looks, especially as there are no tricky points to line up. All you need is a basic familiarity with foundation paper piecing.
Start by printing the template, which is available in A4 and letter-size paper formats to ensure it prints correctly. Each block needs two copies of the template.
Foundation paper piecing tips
- Check the measurements of your printed templates before sewing to ensure everything has printed at the correct size.
- When cutting, if in doubt, cut the fabric larger and trim off excess after sewing.
- Use a very short stitch length on your sewing machine. The extra perforations will help you to tear the paper away.
- Press each piece and trim away any excess seam allowance before sewing the next piece.
- Turn your iron’s steam off. Steam will make the paper wavy and soggy.
- Be very careful to check that you are cutting just the seam allowance when trimming with your rotary cutter. We have all accidentally folded the fabric the wrong way and sliced off the lovely fabric we just sewed in place instead of trimming the excess seam allowance.
- Keep your tweezers handy for picking out small bits of paper.
- I never pin or use glue when foundation paper piecing. Some people do. Do whatever works for you.
Cutting instructions
All measurements are given in inches, and the sizes listed include an allowance to make sure you have a bit of wriggle room for foundation piecing. Strips can be cut larger for extra margins for error.
I have listed the colours traditionally used for each section, even though I hope my bee mates will mix things up a bit. The numbers in the first column correspond to the numbers on the templates.
Colour X (red)
Cut two of each size for each flag block (one for each paper-pieced section).
| Piece A | Piece B | |
| 1 | 7½ x 1¼ | 6½ x 1¼ |
| 8 | 8 x 2¼ | — |
Cut one extra piece 2 x 8 inches for the flag centre. This is not paper pieced and needs to be cut accurately.
Colour Y (white)
Cut two of each size for each flag block (one for each paper-pieced section).
| Piece A | Piece B | |
| 2 | 6½ x 1½ | 8 x 1½ |
| 3 | 7 x 1 | 5½ x 1 |
| 6 | 7 x 1¼ | 7 x 1¼ |
| 7 | 4 x 1¼ | 4 x 1¼ |
Colour Z (blue)
Cut four rectangles, two in each of the following sizes:
- 7 x 3½
- 5½ x 2¾
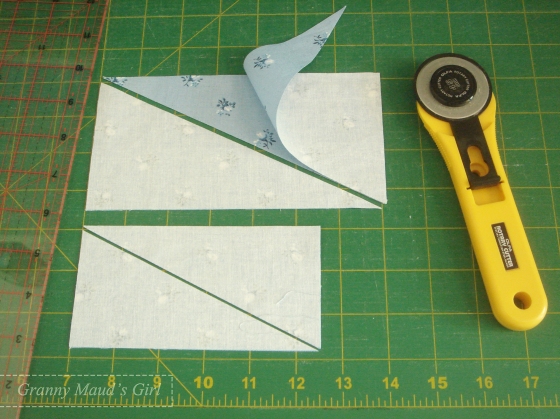
Place the matching pairs right sides together and cut on the diagonal from point to point. Placing them with right sides facing before cutting on the diagonal is very important!
Cutting these pieces this way does not waste much fabric and makes sure that the grain direction of the fabric sits the right way in the finished block, which I find helps blocks stay in shape and not stretch. (It is not feasible to fuss about the grain direction of the diagonal stripes, but the grain direction of these triangles and the horizontal and vertical stripes can be easily managed.)

Cut two rectangles according to the measurements given, then place them right sides together and cut on the diagonal from point to point.
Piecing instructions
Each block is made up of five sections: a centre piece and two each of Piece A and Piece B. I have shown how Piece B is assembled. Piece A is essentially the same, with the addition of piece 8. If you are a confident paper piecer, you can skip this section and just sew the sections together by following the numbers on the template.
Start by placing pieces 1 and 2 face together on the unprinted side of the paper. Hold them up to the light to check the placement. The fabric of piece 1 should cover its area with at least a ¼-inch seam allowance all around. Piece 2 should line up with one long raw edge of piece 1 and be placed so when stitched and folded back it will cover its area. Stitch along the line between pieces 1 and 2.
Then add piece 3.
Keep adding pieces.
When all the pieces are sewn and the block is pressed, turn it so the printed side faces up and trim it as shown. The finished measurements are written on the template so you can check all is well.
Make Piece A in a similar fashion.

If you are nervous of trimming seam allowances with your rotary cutter, use scissors and eyeball a ¼-inch seam allowance.
When you have the four paper sections assembled and trimmed, tear away all the backing paper and give them a good iron (with steam if you like, now the paper has gone).
Lay them out as pictured, and sew them together using a ¼-inch seam allowance.
Press the last two seams towards the centre piece, and you have finished your block!
If you use this free template and tutorial to make your own blocks, please let me know by sharing a photo on the Granny Maud’s Girl stuff Flickr group or on Instagram (@grannymaudsgirl). I love to see how others interpret the same idea differently.
I think a quilt of these blocks would look stylish in my electric blue Mini Cooper, and I was born in Britain, so it is not a strange quilt for an Australian to make. I am not really a flag-waving patriotic sort; I just like the shapes and patterns of the Union Jack. At the moment, I am thinking of making a pieced blue backing with the Southern Cross stars on it. We will see how I go at the end when the top is assembled.


You know I love me a bit of paper piecing!! I’ve always wanted to try this block 😍
I would paper piece everything if I could – except for the appliqué stuff. I am rather fond of appliqué too.
Wow Carla – you’re becoming the queen of tutorials!! What a detailed explanation you have provided. I hope you get beautiful blocks in due course. I didn’t imagine you in an electric blue car, though a Mini Cooper does seem appropriate – small and compact. My husband drives an electric blue Suzuki Swift Sport and I will think of you when I drive it now.
I think the word ‘tutorial’ for me is just posh for ‘making it up as I go and taking photos in case it works out’!
After years of catching Melbourne trams, I had my heart set on a Mini when we moved to Perth. I wanted red (of course) or British racing green, but the blue demonstration model on the showroom floor was a really good deal. I have had it for eight years and its name is Button.
That’s a really great tutorial, very complete, clear and detailed, and I naturally approve of the subject! I feel that cushions for the back seat of the Mini would be most appropriate. Should I ever feel tempted to produce Union Jacks, I now have the ultimate guide….
I have almost made or bought Union Jack cushions for the Mini countless times! I am sure there will be a spare block.
It’s time, then…
I don’t know when I’ll get to this, but thank you so much! Your red, white, and blue blocks are lovely.
Happy to help. If and when you do get to it, I would love to see a photo!
Wow Carla, you are amazing, such a comprehensive tutorial. Cannot wait to make this, get FIVE days off week after next week YIPPEE = FIVE days of sewing.
I am sure you will have truly earned those five days off with loads of days working hard!
I doubt any of our bee buddies will need this much detail after Rebecca’s blocks, but I thought it would help others.
I love these Carla! Thanks for your brilliant tutorial too! You are going to have a fabulous quilt!
I hope so! I really wanted my bee mates to put their efforts into something I would love and use, and not some blocks I would forget in the back of the cupboard. That would be such a waste of their work!
Great tutorial Carla, I have been looking at this block for some time but haven’t had the courage to try it out. No excuses now. A good gift idea for a British friend in colours to match their décor. Look forward to the cushion in the back seat of the mini!
You will be surprised, Tricia. It is not as scary as it looks as there are no points to match up or strange bulky bits to wrestle with.
This block is very fitting for a queen! Love the Union Jack, cannot wait to see how they all turn out.
I might need to wear a tiara every time I want to use the finished quilt, eh?
Oh how fun that you are playing with the color scheme a bit wih these blocks. I look forward to seeing what your bee makes make for you!
I found myself laughing at myself for being such a stickler about the diagonals and then throwing away the rules about the flag’s proper colours.
Great block, I love these (especially being a Brit!). I’ve seen a quilt pattern called Victory Garden before but I prefer your blocks, you’ve got the authentic flag in there, great fabrics too, this quilt will be fantastic, can’t wait to see the finished item.
I am pretty sure that pattern is on my Pinterest boards as one of my inspirations. I am rather excited about the prospect of these blocks trickling in over the next month or two.
Your quilt will look awesome!
Thanks! I hope so too!
Wow! That is quite the impressive tutorial and an even more amazing block. You know how intimidated I get with paper piecing but I’m up for the challenge. And lucky you, I have lots of great fabrics in these colors to choose from.
You will be a paper-piecing pro soon! I really do think you will find this easier that Rebeccaâs, Diana.
I am glad you have plenty in your stash to play with. I tried to stick with âsimpleâ colours that most of us have at least one of.
I used a paper pieced Union Jack pattern for my MiL’s quilt. I think it’s only fair that hubby gets one on his quilt too … only this time correctly proportioned thanks to your pattern 🙂
I didn’t find another paper-pieced pattern. If only I had thought to ask you!!
Love this block! Thank you for the tutorial too with the RIGHT proportions! I grew up in England so I find it particularly important to have a Union Jack that really looks like a Union Jack! The PP is going to make it very precise too.
I am glad you like it, Nesta! I would hate to choose a bee block that no one enjoyed making.
These are looking great! Well done!
I am quite pleased with the ones I made and excited to see what my bee mates come up with.
Very beautiful samples of the union jack! Thank you for this tutorial!
You are welcome!
Pingback: Pincushion swap | Granny Maud's Girl
Pingback: Union Jack quilt top | Granny Maud's Girl
Though not British I have a soft spot for some reason for this flag. Perhaps it is the red white and blue (U.S.A.) combo that I love. Thanks for sharing the tutorial. I just love this! Your quilt is going to be spectacular. Someday I will make a quilt with this block : ) Janita
Pingback: Flashback Friday: Tea with friends | Granny Maud's Girl
This is the best tutorial I have found online for a Union Jack block! I’m making a wall hanging for my mom and know she will love it. I might also make one to use in my mini (Poppy) as well, as I love how yours came out 🙂
You drive a Mini called Poppy too?! What a fun coincidence! I have almost finished binding my quilt. Then, I have to take my Mini and the quilt somewhere to have their picture taken together.
Pingback: Poppy’s quilt | Granny Maud's Girl
Pingback: April Sort Of Kicked My Butt!!! – FACETFULLY…
I just wanted to let you know that this was such a great, detailed tutorial and pattern! I needed something Union Jack-y for a friend’s baby shower, and I’m so glad I found this! I’ll post pictures after the baby shower and make sure to tag you on IG. 🙂
I have made this twice, as a little pillow. Attempting my third today, and top right part A is all wrong, not mirror image. I don’t remember doing any fancy tricks last 2 times, any idea what I am doing wrong?
I have just printed off this pattern to make a quilt for my husband, next step is to get all the fabric together. Your instructions are lovely and clear and I am looking forward to making this up. Thank you.
If looking at the block as a whole, is the top half A – B and the bottom half B – A? When I look at the proportion of blue to white to red, the white is skinnier on the lower left and upper left across the top of the flag, and lower right and upper right for the bottom portion of the flag. Just want to make sure I’m sewing correctly. Thanks for designing this. It’s a very detailed block!
Yes, I think you have the right of it!
Living in Wales I’d love you to make us a dragon block lol my Union Jacks might go funky in every colour going lol