
I have achieved a new record for my knitting: this cushion has the most colours I have ever combined in one knitted project. I chose Marie Wallin’s pattern ‘Folk Fairisle Cushion’, but I went rogue with my colours. Looking at … Continue reading

I have achieved a new record for my knitting: this cushion has the most colours I have ever combined in one knitted project. I chose Marie Wallin’s pattern ‘Folk Fairisle Cushion’, but I went rogue with my colours. Looking at … Continue reading

I was invited to a baby shower last weekend, so I crocheted a baby gift to take. I might know next to nothing about the care and maintenance of babies, but I think I am pretty good at making baby … Continue reading
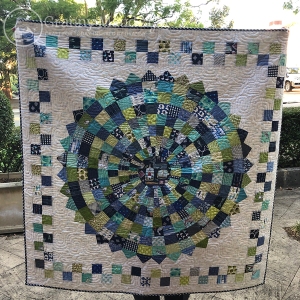
My lovely neighbours have another grandson (their fifth!), and I again offered to make a quilt. As before, I invited the baby’s grandmother into my sewing room to choose some starter fabrics and pattern ideas. We agreed to use a lot … Continue reading

One of the unfinished projects that has been lurking in my sewing room has been oven mitts. Long ago, I bought some Insul-Bright insulated wadding, and I set it aside with some kitchen print fabric with the intention of making … Continue reading

In recent months, I needed gifts for new babies, so I crocheted a couple of toys. The first was for my Kiwi neighbours. Crocheting a kiwi crossed my mind, but I chose to make a sheep instead because I already … Continue reading

I decided that my May UFO would be the Splendid Sampler blocks that have been lurking in my cupboard since 2016. Having made a Dear Jane quilt and being someone who enjoys making tiny blocks, I thought it would suit … Continue reading

I recently finished two very out-of-character knitting projects at the request of friends and family. A dear friend asked me to make a Klein bottle hat for a maths-loving boy. (I had to look up a Klein bottle. Think of … Continue reading

I have not yet shared my May UFO because it is away being long-arm quilted. May’s UFO, a sampler quilt, was such a large project that I set myself a far more modest goal for June: finish a top that … Continue reading

I have finished another UFO! This one dates from 2018. My April goal was to turn this kokeshi panel into a cushion. I made it originally as a humidicrib cover with fabric remnants I had bought in Japan, but when … Continue reading

Earlier this year, LoveCrafts asked me whether I would like to try some of their products. Of course I would! My first thought was to make something for the new grandson, so after much delay and consultation with his mum, … Continue reading
